Pages

Showing posts with label Halloween. Show all posts

Friday, October 30, 2015

Masquerade, Paper Faces on Parade.


Just throw on a mask! I absolutely love this costume idea because it is super easy and perfect for any of you who are planning on dressing up last minute. I bought this beauty at Charming Charlie.  

For the makeup, I did my all time favorite smokey eye (also used for pirate costume) and you can check out the details HERE.   

Happy Halloween!!!
xoxo


Thursday, October 29, 2015

How to: Deer Makeup

Hello everyone! I absolutely love this makeup look so much that I'm seriously thinking about doing it for Halloween! I hope you found this video useful and if you try it out, let us know how it turned out! Enjoy!!

Tutorial:


Products used:

Mac Cosmetics Matchmaster foundation - 2.0
Ben Nye - white makeup
Maybelline Eyestudio - blackest black
Sephora's Glitterguard
Too Faced - Chocolate Bar palette (white chocolate, salted caramel, milk chocolate, & semi-sweet)
Amber Glitter from Hobby Loppy
Morphe Palette- 35B (white)
Lash Adhesive
Makeup Forever lashes
Forever 21 lashes (lower lashes on the outer corner)
Antlers are from Etsy

If you try this makeup out, tag us on Instagram @puckerupstyle! We would love to see how it turned out!

xoxo


Wednesday, October 28, 2015

A Pirates Life For Me.

Yo ho, yo ho here is an easy, DIY pirate costume that I seriously put together in minutes!

Top: any loose, white blouse will do (I believe mine is from China...)
Head Wrap: black scarf
Earrings: gold hoops
Head Piece: I bought this cute head piece at Icing's and I just wrapped it around the scarf to add something a little extra

For my makeup, I did my favorite smokey that I've actually already blogged about. HERE is the link!!

xoxo


Tuesday, October 27, 2015

How to: Sugar Skull Makeup

Hey guys! I hope you all enjoy this sugar skull makeup that I created. I had so much fun doing it and I absolutely love the solid glitter eyes! Who doesn't love glitter? If you try it out, please send us a picture. Enjoy!


Check out the tutorial!!
Products Used:

Mac Cosmetics Matchmaster foundation - 1.0
Ben Nye - red, white, and black trio palette
Mary Kay Cream Liner - black
Hard Candy Walk the Line Liquid Liner - Black Glitter
Black glitter from Hobby Lobby
Gems, from any craft store
Lash Adhesive
Concealer brushes - large and small one
Mac Cosmetics Liner Brush - #208
Cover Girl Perfect Blend eyeliner - black

xoxo


Monday, October 26, 2015

4 Easy, Fun, And Yummy Halloween things to do with your little ones.

This post highlights 4 of my favorite Halloween (ie) things to do with my kids!
Scroll down and click on the link below each picture with details on how to do that particular activity!


Paper Plate Ghost

We hope you have a blast doing and creating these fun things.
Holidays are so fun to celebrate with little ones!
xoxo


Sunday, October 25, 2015

Edible pumpkin patches!

We had such a fun time making our very own edible pumpkin patches.

Here's what you need:
Chocolate pudding
Oreos
Pumpkin candies
Gummy worms

1: Make the chocolate pudding (you could always buy it pre-made as well).

2: Crush up the Oreos (I put mine in a ziplock baggie and used a rolling pin to smash them).

3: Scoop the pudding out into bowls and sprinkle the Oreos over the top.

4: Place the pumpkins and gummy worms wherever you want on top of your pudding/oreos.


Enjoy your yummy pumpkin patch desserts!
xoxo


Saturday, October 24, 2015

Halloween Play-doh fun!

My littles absolutely love playing with Play-doh. 
I usually don't play with them because I am using those few precious minutes to catch up on things or do whatever I need to do that day (like shower)!
But, since it is Halloween time and I love doing festive activities with them, I thought we'd sit down and make some fun Halloween things with our freshly made play-doh.
We seriously had a blast. It entertained them so much longer than I thought and we were dying laughing over all the cute and silly creatures we were making!

Here's what you need:
*Halloween cookie cutters (I've just collected mine over the years mostly from Target and Wal-mart).
*Play-doh (I absolutely love THIS recipe).
*Googly eyes (Not pictured here but you see them on our final creations. You can get some in bulk HERE).

My Olivia came up with these little "blobs" that we all thought were hilarious!
Anyway, the sky is the limit with these creations, 
SO...
Happy Halloween play-doh(ing)!
xoxo


Friday, October 23, 2015

Apple Cider Popsicles With Gummy Worms Inside.

These yummy apple cider popsicles with gummy worms inside will have your littles squealing with delight, and they are SO easy to make which makes them even better!


Here's what you need:
*Popsicle mold (You can find the same one I have HERE).
*Apple Cider
*Gummy Worms

1: Place 2-3 gummy worms inside the molds. Just scrunch them up inside.

2: Pour the apple cider in until your mold is full. (There is usually a line to help you out.)

3: Place the popsicle sticks inside and put them in the freezer until completely frozen.

*The best way to get the popsicles out of the molds is to hold them under warm water until they loosen up a little bit. They usually slide right out after 5-10 seconds!


I hope your littles enjoy these yummy, creepy popsicles as much as mine did!
xoxo

Thursday, October 22, 2015

Tribal/Warrior Halloween Makeup


This makeup look was so much fun to create! I hope you guys enjoyed this fun and colorful warrior princess look! Make sure you check out the tutorial above! (:
xoxo


Wednesday, October 21, 2015

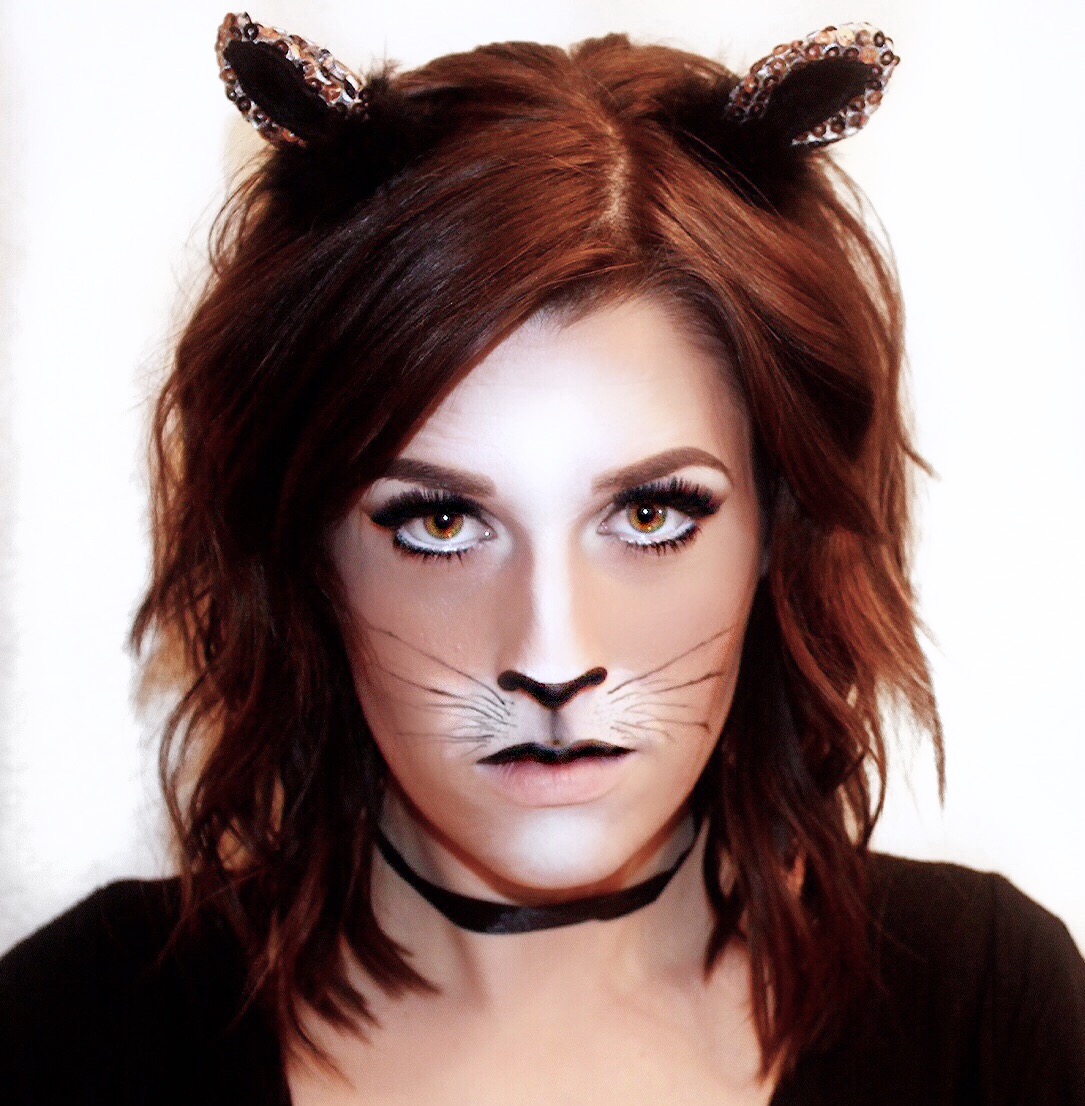
5 Steps: Kitty Cat Makeup


For the eyes, I really wanted that "cat-eye" look... obviously, but I wanted it to be simple. I used scotch tape to create that dramatic line and used warm browns and blacks for the crease and outer corner and a pretty gold for the center of the lid. You can't go wrong with a cat eye like this so play around with colors and do what you think looks good!

Step 1: Apply the nose
I used a black eyeliner pencil (anything will do) to line the shape of the nose that I wanted before I filled it in. Lining everything first will allow you to fix anything before it gets too dramatic! For filling it in, I used a black gel liner to ensure that it would be solid black. I usually use Maybelline's gel liner in blackest black but I was out so I found one around my house by Mary Kay which I actually really liked because it's not super creamy (which is good for halloween makeup because you don't want that black smudging everywhere.)

Step 2: Apply white above your lip, below the nose
For the white, I used Ben Nye's character wheel in red, black and white and I just applied a generous amount with my finger allowing for the perfect blend. 

Step 3: Apply a black line below the nose, dots for the whiskers, and on the upper lip
Sorry the dots are so subtle in this picture, they looked great in real life but you get the idea. Again using a black pencil first, then the gel liner, I drew a line from the center of my nose meeting the center of my upper lip and blended. I chose to fill in my upper lip only because I thought that it would be more realistic. I really liked the way it turned out!

Step 4: Apply white in your highlight area in the center of the face (forgot the chin in this picture)
Again, going for something more realistic, I added white on the center of the face using my fingers. It's hard to see in the picture but I used a flat concealer brush and feathered out the lines making it look like fur. 

Step 5: Apply color to the rest of the face and add your whiskers                 
I used Anastasia Beverly Hills darkest shade in her contour kit mixed with a little, and I mean a little, black eyeshadow (any will do, I used a black shadow in my Lorac Pro palette) and applied that over the rest of my face. For the whiskers, have fun with it! I didn't want mine to be super perfect and straight so as you can see some of them are shorter and more wavy then others. 

There is no right or wrong with this look so be creative and have fun with it!

xoxo