Pages

Monday, August 31, 2015

Hair Tips 101.

                                         
As a hairstylist, I'm frequently asked if there is anything specific I do to make my hair long, shiny, smooth, texturized, healthy, etc. I can honestly say there are a number of things that I do that PERSONALLY work for me. Also, I'll list some facts I know that need to be shared so everyone can be more educated on hair. I hope you benefit from this post and find some helpful tips that will change the way you treat your hair. 


HAIR TIPS

  • DO NOT wash your hair with scolding hot water! I know that there is nothing better than a nice, relaxing, steamy, warm shower but when it comes to shampooing and conditioning, turn the water level down to a more cool temperature when rinsing the product out. Hot water can dry out your hair, making it feel almost brittle and weak. With dryness comes dulness, making your hair not as shiny. Also, a dry scalp will cause dandruff and we all know how attractive white flakes are... not!!  
  • Shampoo is not meant for your whole head of hair. You only need a little amount to get in the roots and mid shaft (middle of your hair strand.) When you rinse the shampoo out, the water will make the product slide through your ends and out. Placing shampoo on your ends will only dry your hair out more. 
  • Conditioner was made for the ends of your hair!! If you have dry hair, than a hydrating conditioner will be your BFF. You can also give your hair a nice little treatment while your at it by LEAVING the conditioner in your hair for about 5-15 mins. If you have enough time then leave it in for 30-60 minutes. Go big or go home! Conditioner is what will help you with that shine and smoothness that you're looking for. 
  • If you suffer with oily hair, then conditioning your hair can be tricky. Don't have the product touch your roots because if you do, it's pretty much game over right there ha. Make sure your shampoo is COMPLETELY rinsed out. Stay away from products that are creamy or oily. 
  • If you suffer from dry hair, oils are great! Hydrating shampoos and conditioners are my most favorite things to use for my dry hair clients. 
  • INVEST in good products! I know we all wish that money grew on trees and I understand that expensive products can be so frustrating, but the reason why some products are so pricey are from the ingredients in the products. Quality is everything! I'm not saying that all store bought products suck because they definitely don't, but if you can splurge on that conditioner, or texture spray, or heat protectant, your hair will thank you for it! 
  • BLONDES: Educate yourself with your hair! Keep up on your toners. Typically toners last for about 4 weeks if using good products. When you notice your hair turning a little yellow and brassy, it's time to make an appointment. ASK YOUR STYLIST what you can do to help make your tones last longer. There are some great at home products out there that will help you keep your color fresh and looking great. 
  • Stay up to date on your trims. Hair grows about 1/2 inch per month. So keep in mind that your ends need to be freshened up every 8 weeks. If your ends are transparent, then you're way overdue. 
  • DO NOT over curl or straighten your hair. Think about it, your straightener is set for 350 degrees and going over your already straightened hair 3+ times is just giving your hair more damage and heat that it does not need. Also, USE a heat protectant! 
  • DO NOT brush your hair when it's wet unless you have the right brush for it. Your hair is at its most vulnerable stage when wet so when you brush it, it can stretch causing it to break. If you need to brush your hair then look into the WetBrush. It's amazing and your hair will love you for it! 
  • Diet can play a HUGE part in your hair. Well... lets be real, diet basically plays a huge part in everything! With hair, it can help with growth, shine, and many other beneficial things. Study certain foods and the nutrients they provide. It will reveal a whole new world to you and answer a lot of questions you might have. 
  • Don't be afraid to ask your stylist questions about your hair! It's their job to keep you updated on what you need, what you're doing wrong, and what will be best for you personally. Educating yourself will only help you more so that you're completely aware of how your hair works.    
So those are just a few of my tips for now (I have plenty more :).) If you have any more specific questions, whether it be with hair styling, cutting, color, or health, I'm here to help! Just leave a comment below! 
xoxo


Sunday, August 30, 2015

Oregon State Fair.

Yesterday, my husband and I took our littles, Olivia and Clara to the Oregon State Fair! 
I don't know about you guys but in this family it's all about the food!
Between the fried pickles, mexican food, beef brisket, mozzarella sticks, ice-cream cones, and my personal favorite, elephant ears, we were in food heaven! 
The girls loved looking at all the animals and getting to ride their own little pony,
I of course loved the food, and Michael was in heaven walking through the reptile exhibit. They had all sorts of ginormous snakes like pythons, cobras, rattlesnakes, spiders, turtles, and fish (piranhas). They even let us all pet an alligator! 
It was the perfect fair day!
Until next year Oregon State Fair!


Dress: Old Navy (on sale) || Shoes: Forever Young (old)
Olivia & Clara: T-shirt: Target (similar) || Overalls: H&M (on sale) || Shoes: Old Navy (on sale)

xoxo

Wednesday, August 26, 2015

Black as Night.


 Can I just tell you how OBSESSED I am with this smokey eye! I'm a girl who is such a huge fan of the color black and wearing a solid black smokey eye couldn't make you feel sexier. This look is so bold and dramatic that it is perfect for a night out. Give it a try and let us know what you think!
Products Used:
Eyes
Sephora Glitterguard- Eyeshadow Primer
Smashbox Palette- Wheat and Sable (transition shades, blending)
NYX Kohl Kajal Liner- Black (all over the lid, under eye, water line)
Urban Decay Naked 2 Palette- Blackout (all over the lid, blending, under eye)
TIGI High Density Eyeshadow Palette- Vanilla and Champagne (highlight: inner corner of the eye, brow bone)
Brows
Mac Cosmetics Cool Neutral Palette- Brun (eyebrows)
Face
Mac Cosmetics Matchmaster- 2.0 (foundation)
Morphe Contour/Concealer Palette- Lightest Colors (concealer and highlight: under eyes, forehead bridge of nose, cupids bow, chin)
NYX Matte Bronzer- Medium (contour)
Anastasia Beverly Hills Contour Kit- Banana, Vanilla (setting under eye concealer) Fawn, and Havana (bronzer)
Bobbi Brown Shimmer Brick Compact- Beige (highlight)
Tiffany Leigh Cosmetics Slimline Lip Pencil- Natural
Lips
Mac Cosmetics Lipstick- Japanese Maple
NYX Mega Shine Lip Gloss- Sugar Pie
Brushes 
Elf Smudge Brush (applying black, blending/smudging)
Cheeky Blending Brush (blending harsh lines)
Naked 2 Brush (And more blending, other side used to apply eye highlight)
Small Angled Brush (brows)
Kabuki Brush (foundation)
Claires Concealer Brush
Beauty Blender (blending in concealer)
Claires Blending Brush (Bronzer)
Morphe Delux Flat Contour Brush (Contour)
Real Techniques Setting Brush (Highlighter)
xoxo


Monday, August 24, 2015

All That Glitters Is Gold.

Lately I have been doing this makeup look that is so wearable with any colors you choose to wear. You can make this as simple, or as dramatic as you want! I LOVE putting a pop of shimmer right on the center of my lid and I drool over anything that is gold so this color was perfect. These are all the products I used:
Eyes
Anastasia Beverly Hills ARTIST PALETTE 
                   1-Dusty Rose(transition shade)
                    2-Punch Fuschia (crease shade)
          3-Unicorn (crease shade)
                             4-Aubergine (outer crease to darken)
Color Pop Cosmetics -NILLIONAIRE (Intense brown/gold color on the lids)
Maybelline Gel Liner - BLACKEST BLACK
Lashes - NATURAL LASH

Brows
Anastasia Beverly Hills - DIPBROW (ebony)

Face
LorealPro Infallible Foundation - SUN BEIGE
MaskCARA Cosmetics - IIID FOUNDATION PALETTE  (Medium Shade)
*used this entire palette for my Highlight, Contour, & Blush.
Becca Cosmetics X Jaclyn Hill Illuminator - CHAMPAGNE POP
*used on cheekbones, inner corner eye highlight, tip of my nose, brow bone, and cupids bow.
MAC Fix Plus to set my makeup.

Lips
Colour Pop Cosmetics - LIQUID LIPSTICKS (in the shades Midi, and Trap). 

xoxo

Friday, August 21, 2015

Baked Spiced Peaches.

 
This is definitely one of my all-time favorite desserts. I have no clue how healthy it is, but fruit is the main ingredient so how bad could it be?! One of the most important things you can do for this recipe is to make sure your peaches are perfectly ripe! But since it's peach season that should be easy!

Baked Spiced Peaches

3 ripe peaches cut in half
3 tablespoons brown sugar
1 1/2 teaspoon cinnamon
1/8 teaspoon nutmeg
 1 slice (per peach) of butter (about 1 teaspoon)
vanilla ice cream

Preheat the oven to 375 degrees Fahrenheit.

Lightly grease an 8x8 baking dish. Place peach halves skin down onto the dish. Slice a thin piece of butter and place it on top of each peach. About 1 teaspoon per peach. In a separate bowl combine the brown sugar, cinnamon, and nutmeg. Once combined add about a tablespoon of it onto each peach. I made sure to sprinkle it all over so that the top was covered. Place it in the oven and bake for 10-12 minutes. Make sure the butter is melted and the peaches are pretty soft. Mine took exactly 12 minutes. Take them out of the oven and with a spoon lightly scoop out some of the spicy juices in the middle and set a side for a minute while you place a scoop of your favorite vanilla bean ice cream on top of the peach. (My personal favorite is the Private Selection brand crushed vanilla bean that can be found at Smith's and Fred Meyer. Finally take the spoonful of yummy juice/sauce and pour it over the top of your icecream and prepare to enter peach heaven!

Enjoy

Printable Recipe HERE.

xoxo


Wednesday, August 19, 2015

Casual & Classy.

 
Top:Anthropologie(currently on sale)||Denim:Jessica Simpson||SHOES: Guess(very old)similar pair HERE||Necklace:H&M(not on their website, but still in stores)You can pair almost any kind of necklace with this causal look. I loved this necklace HERE

Thanks again to the amazing Talisa Myers for the incredible photos! Take a look at her work!
Instagram: @memoriesbymyersphotography
xoxo

Monday, August 17, 2015

Purple is the Color for Royalties.


Sorry for the million photos! I just couldn't believe how well the camera captioned this makeup! I absolutely LOVE the bright purple!! 
Products Used:
Morphe 35B Palette- light purple-second row on the right, second from the top (crease, under eye), pink/purple-right smack in the middle of the palette and the shimmery purple right above that color (for the lid and the shimmery purple also used on inner,lower lash line), black-bottom, right corner (outer, lower lash line), white-top, left corner (highlight)
Lorac Pro Palette-Cream, Taupe, and Mauve (transition, blending), deep purple (crease)
Nars Eye Paint-Black Valley
Mac Cosmetics Cool Neutral-Brun (brows)
Mac Cosmetics Matchmaster-2.0
Morphe Contour/Concealer Palette-two darker shades on the left side
Anastasia Beverly Hills Contour Kit- Java and Fawn
Smashbox Blush Rush-Flush (blush)
Urban Decay Naked Illuminated-Luminous (highlighter)
NYX Jumbo Eye Pencil-Cottage Cheese (waterline)
Tiffany Leigh Cosmetics Lip Pencil-Natural (lip liner, fill in lips)
(try NYX Slim Lip Pencil in Natural)
TIGI Decadent Lipstick-Beauty, Peace (used for highlight on bottom lip)
TIGI Luxe Lipgloss-Diamonds & Pearls (center of lower lip to add a blush, bitten effect)
Helpful Tip: When applying the shimmery purple to your lid, use glitter glue and your finger! A synthetic brush will work as well, but not as good as your finger. Trust me!
P.S. Who here knows the lip color Styled in Sepia by Mac Cosmetics? If you do, you know it is the most beautiful color but it is no where to be found. Sadly, Mac Cosmetics discontinued it however,  I've been searching EVERYWHERE for a mimic and TIGI's Decadent Lipstick in Beauty has been the closest I've found. The only difference is that Beauty is slightly more shimmery. Try it out and let me know what you think!
xoxo


Friday, August 14, 2015

Oatmeal & Chocolate Chip Cookies.

These oatmeal chocolate chip cookies are seriously THE BEST cookies on the planet! I am so picky when it comes to cookies. Number one, I absolutely hate nuts so no nuts in the cookies. Number two, they can not be even slightly overcooked. I like them soft and chewy. And number three, I am not going to make cookies unless they have chocolate chips in them. Okay, that may be a slight exaggeration but seriously it's mostly true! Anyway, enough with the chit chat let's get to the actual recipe. You guys are going to die!

My recipe is slightly adapted from THIS recipe. 

Oatmeal & Chocolate Chip Cookies

1 cup butter softened 
1 cup brown sugar
1/2 cup white sugar
2 eggs
2 teaspoons vanilla
1 1/4 cup all-purpose flour
1/2 teaspoon baking soda
1/2 teaspoon salt
1/2 teaspoon ground cinnamon
3 cups quick-cooking oats
1 12 oz. bag semi-sweet chocolate chips

Preheat the oven to 325 degrees F.

In a stand-still mixer use the paddle attachment to cream together the butter, brown sugar, and granulated  sugar. Let it mix for about 5 minutes so that it is extra fluffy. Beat in the eggs one at a time. Then mix in the vanilla. In another bowl stir together the flour, baking soda, salt, and cinnamon. Stir in to the butter mixture until combined. Do not over mix. Mix in the quick oats and the chocolate chips. Again, do not over mix. Finally drop by spoonfuls onto a parchment paper-lined baking sheet. 

Bake for 8-9 1/2 minutes. Mine took exactly 9 minutes, but every oven is different so it is important to watch them. Once you cook one batch you will see about how long it takes. I always under bake my cookies a little bit because when you pull them out of the oven to cool they still cook a little bit. Once you pull them out of the oven let them sit on the pan for about 3-5 minutes until they set a little. If you notice that they are still under-baked you can always pop them back in the oven for another minute or so.
Next, transfer the cookies from the pan to a wire cooling rack and let them finish cooling off. Once they are cool you can put them in your tupperware container or wherever you want to store them.
In my opinion these cookies are even better the second day but I of course still eat them the first day. I mean who can resist a freshly baked cookie!

TIPS:
-It is imperative that you do not melt the butter. If you forget to leave it out to soften it's okay to microwave but in 3-5 second intervals. I repeat do not melt it even in the slightest bit!
-Remember to not over mix. (Except for the first step where you mix for about 5 minutes)
-Always line your baking sheets with parchment paper
-Always error on the side of under baking. At least that's what I aways say. Of course if you like your cookies on the crispy side then feel free to cook them a bit longer. 
-I always put my cookies in the microwave for 8-10 seconds before eating so that they are warm and soft when I eat them!

If you try this recipe leave a comment below telling us what you think!
Happy cookie making!

Printable Recipe HERE

xoxo


Wednesday, August 12, 2015

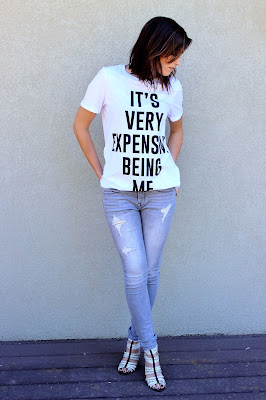
It's Very Expensive Being Me.

 Top: Forever 21 (just barely bought it, but can't find it online)  || Jeans: Express || Shoes: BCBGeneration

 xoxo


Tuesday, August 11, 2015

Sun-Kissed, Summer Glow.


Products Used:
Too Faced Chocolate Bar Palette-Salted Caramel and Milk Chocolate (crease/transition and under eye), Crème Brulee (lid), White Chocolate (Highlight: inner corner & brow bone) 
Morphe Contour/Concealer Palette-2 darker shades mixed, on the very left side (under eye, forehead, bridge of nose, chin)
Anastasia Beverly Hills Contour Kit-Java and Fawn (bronzing for that sun-kissed look)
Nars Illuminator-Super Orgasm (blush)
Urban Decay Naked Illuminated-Luminous (highlight)

xoxo